The Suncast 7×7 shed offers 317 cubic feet of storage with a steel frame and multi-wall resin panels. Easy-to-follow assembly instructions ensure a smooth setup process.
Overview of the Suncast 7×7 Shed
The Suncast 7×7 shed is a durable, low-maintenance storage solution designed for outdoor use. With 317 cubic feet of storage space, it features a steel frame and multi-wall resin panels for longevity. The shed is ideal for storing outdoor equipment, tools, and seasonal items. Its compact 7×7 footprint makes it suitable for smaller yards or spaces. The resin construction resists rot, insects, and harsh weather conditions, ensuring long-lasting performance. This shed is a practical choice for homeowners seeking a reliable and stylish storage option that requires minimal upkeep.
Importance of Proper Assembly
Proper assembly of the Suncast 7×7 shed is crucial to ensure structural integrity, stability, and weather resistance. Correctly following the instructions guarantees a secure and durable storage solution. Misalignment or gaps can compromise the shed’s performance, leading to potential damage from wind, rain, or pests. Proper assembly also ensures the shed’s doors function smoothly and the roof remains watertight. By adhering to the guidelines, you maximize the shed’s storage potential and extend its lifespan. Taking the time to assemble it correctly is essential for safety and long-term satisfaction with your outdoor storage investment.
Preparation for Assembly
Gather all tools and hardware, ensuring you have a flat, level site. Clear debris and prepare the ground to ensure proper shed assembly and stability.
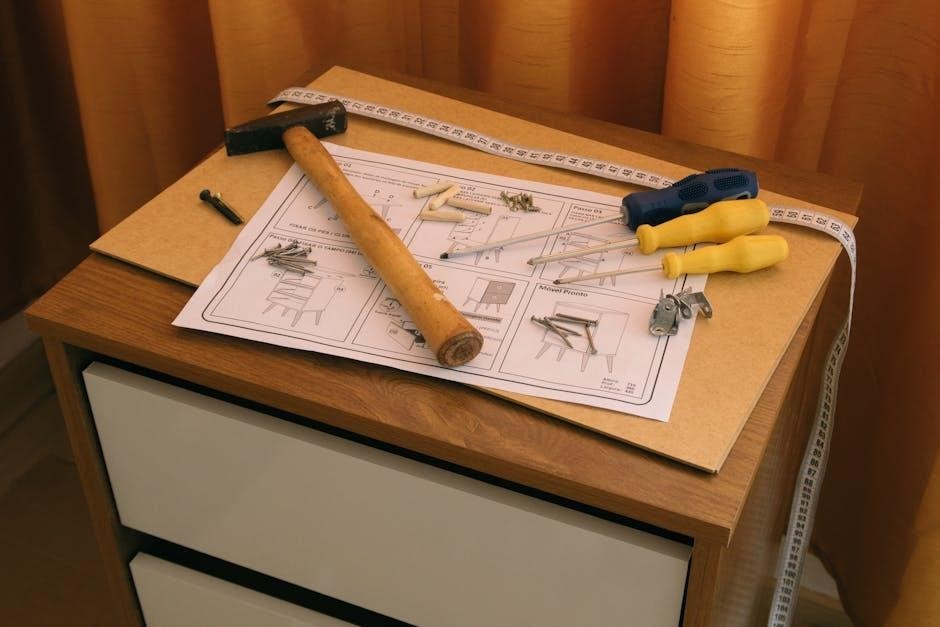
Tools and Hardware Needed
Essential tools include a screwdriver, wrench, and Easy Bolt Driver. Hardware like lag screws, masonry fasteners, and washers is required for securing the shed. Ensure all components from the kit are present. Additional items like a level, measuring tape, and safety gear are recommended. Refer to the manual for a detailed list. Some hardware, such as masonry anchors, may not be included and must be purchased separately. Visit the Suncast website for specific product requirements to ensure a smooth assembly process. Proper preparation of tools and hardware is crucial for successful shed construction.
Site Preparation and Leveling the Ground
Ensure the site is clear of debris and vegetation. The ground must be level to prevent structural issues. Use a spirit level to check evenness and adjust the ground as needed. For concrete slabs, ensure the surface is clean and dry. If anchoring to wood, verify the platform is sturdy and level. Mark the area according to the shed’s dimensions, leaving space on all sides for proper fit. Double-check that the site is square and level before proceeding with assembly. Proper site preparation ensures a stable and secure foundation for your Suncast 7×7 shed.
Core Assembly Steps
Core assembly involves constructing the floor, walls, roof, and attaching the door. Follow step-by-step instructions for each component to ensure stability and proper structural alignment.
Assembling the Floor Panel
Begin by unpacking and organizing all floor panel components. Ensure the ground is level and clear of debris. Align the floor panel edges precisely, securing them with the provided hardware. Use a rubber mallet to gently tap pieces into place. For added stability, attach the floor panel to a concrete slab using masonry anchors or to a wood platform with lag screws. Double-check the alignment and tighten all connections firmly. Proper assembly of the floor panel is crucial for the overall stability of the shed, ensuring a solid foundation for the walls and roof to follow.
Constructing the Wall Panels
After assembling the floor, focus on constructing the wall panels. Start by attaching the wall frames to the floor using the pre-drilled holes and bolts. Ensure each panel is aligned with the floor’s edge for a seamless fit. Secure the walls by inserting the provided pins and clips into the designated slots. Use a screwdriver to tighten all connections firmly. Pay attention to the pre-marked ports for doors and windows, ensuring they are correctly positioned. Once all walls are erected, double-check the structure for stability and alignment before proceeding to the roof installation.
Installing the Roof Trusses
Begin by carefully lifting and positioning the roof trusses onto the wall headers, ensuring they are evenly spaced as per the instructions. Align the trusses with the pre-drilled holes on the wall frames and secure them using the provided bolts. Tighten the bolts firmly but avoid over-tightening, which could warp the frame. Once all trusses are in place, check the structure for squareness and stability. If necessary, adjust the trusses slightly to achieve proper alignment. After securing, proceed to attach the roof support brackets to ensure the structure can handle weight and weather conditions effectively.
Securing the Roof Panels
After installing the roof trusses, begin securing the roof panels by aligning them with the truss brackets. Fasten the panels using the provided screws, ensuring they are tightly fitted to the frame. Apply a bead of sealant around the edges to prevent water infiltration. Check that all panels are evenly spaced and properly aligned. Once secured, inspect the roof for any gaps or loose connections. Tighten all screws firmly to ensure the roof is stable and weatherproof. Finally, verify that the roof is level and securely attached to the shed structure before proceeding to the next step.
Attaching the Door and Hardware
Begin by aligning the pre-assembled door frame with the shed’s doorway. Secure the hinges to the door and the shed’s frame using the provided screws. Tighten firmly to ensure stability. Next, attach the door handle, ensuring it is centered and functional. Install the locking mechanism by aligning the latch with the door frame and securing it with screws. For added security, consider adding a padlock to the hasp. Finally, test the door to ensure smooth operation and proper alignment. Make any necessary adjustments to achieve even closure and secure locking;
Anchoring the Shed
Secure the shed to a concrete slab using masonry fasteners or to a wood platform with lag screws. Ensure stability and prevent movement for safety and durability.
Securing to a Concrete Slab
To ensure stability, secure the Suncast 7×7 shed to a concrete slab using 3/8″ masonry anchors with 3/4″ washers. Eight anchors are required for proper installation. Drill pilot holes into the concrete, insert anchors, and tighten firmly. Ensure the shed’s floor panel aligns with the slab before anchoring. Hardware is not included, so purchase masonry fasteners separately. Follow manufacturer instructions for drilling and anchoring to maintain structural integrity; Proper securing prevents movement and enhances safety, especially in windy conditions. Double-check all connections to ensure a snug fit.
Securing to a Wood Platform
Attach the Suncast 7×7 shed to a wood platform using 1/4″ x 3″ lag screws with 3/4″ washers. Eight screws are needed for a secure installation. Position the shed on the platform, ensuring alignment. Screw into the wood, tightening firmly to prevent movement. Hardware is not included, so purchase lag screws separately. Ensure the platform is level and sturdy before securing. Proper anchoring protects against shifting and enhances durability. Follow manufacturer guidelines for torque and placement. Double-check all fasteners for tightness to ensure the shed remains stable and secure over time.
Additional Features and Customization
Enhance your Suncast 7×7 shed’s functionality with shelves or storage accessories for better organization. Adding locks ensures security, while customization options allow you to tailor the shed to your needs.
Installing Shelves or Storage Accessories
Enhance the functionality of your Suncast 7×7 shed by installing shelves or storage accessories. Start by preparing the area, ensuring the shed is fully assembled and secure. Use the pre-drilled holes or brackets provided in the kit to mount shelves. Follow the manufacturer’s instructions for specific hardware requirements. Place shelves at desired heights to maximize storage space. For additional organization, consider adding hooks, bins, or racks. Ensure all accessories are securely fastened to prevent shifting. Refer to the assembly manual for guidance on compatible storage solutions. This step allows you to customize the shed to fit your specific storage needs.
Adding Locks for Security
To ensure your Suncast 7×7 shed remains secure, consider adding locks to the double doors. Use high-quality padlocks or integrated locking systems for durability. Install locks on the door handles or consider a hasp and staple setup for added protection. Ensure the shed is properly anchored to a concrete slab or wood platform before adding locks, as a secure base enhances overall safety. Refer to the assembly manual for specific hardware recommendations. Adding locks provides peace of mind, safeguarding your stored items from unauthorized access. Choose locks that align with the shed’s design for a seamless and secure solution.

Maintenance and Care
Regularly clean the shed with mild detergent and water to maintain its appearance and durability. Inspect for damage and secure any loose parts promptly to ensure longevity.
Cleaning the Shed
Regular cleaning is essential to maintain the appearance and longevity of your Suncast 7×7 shed. Use a mild detergent and water to wipe down the walls and roof, ensuring no harsh chemicals that might damage the resin. A soft-bristle brush can help remove dirt and debris from corners and crevices. Avoid using abrasive cleaners or power washers, as they may scratch the surface. Rinse thoroughly with clean water to remove any soap residue. For tougher stains, a mixture of equal parts white vinegar and water can be effective. Always allow the shed to dry completely after cleaning to prevent moisture buildup, which could lead to mold or mildew; Regular cleaning not only keeps your shed looking new but also helps maintain its structural integrity and prevents potential damage from dirt and grime accumulation. Additionally, trimming nearby plants and keeping the area around the shed clear can further protect it from debris and pests. By incorporating cleaning into your routine maintenance, you ensure your Suncast shed remains a durable and reliable storage solution for years to come.
Inspecting for Damage
Regular inspections are crucial to ensure the longevity of your Suncast 7×7 shed. Check the roof for dents, cracks, or loose panels, and inspect the walls for any signs of warping or damage. Examine the doors for proper alignment and functionality, ensuring all hinges and latches are secure. Look for gaps or misalignment in the panels, which could indicate improper assembly or settling. Inspect the foundation for levelness and stability, as uneven ground can lead to structural issues. After severe weather, check for any damage caused by wind, rain, or debris. Addressing minor issues promptly can prevent them from becoming major problems. Regular inspections help maintain the shed’s integrity and ensure it remains safe and functional for years to come.

Troubleshooting Common Issues
Addressing gaps or misalignment and fixing door alignment problems are key challenges during assembly. Ensure proper anchoring and follow instructions to resolve these issues effectively.
Addressing Gaps or Misalignment
Minor gaps or misalignment during assembly can be resolved by ensuring the foundation is level and secure. Check all connections and tighten any loose bolts or screws. If gaps persist, use shims or adjust the panels slightly. Proper anchoring to the ground or platform is crucial to prevent further issues. Inspect the entire structure for any misaligned parts and refer to the manual for guidance. Addressing these problems early ensures the shed’s stability and longevity, preventing potential damage from uneven stress or weather conditions.
Fixing Door Alignment Problems
Door alignment issues can be corrected by adjusting the hinges or door frame. Ensure all screws are tightly secured and check for any bent or warped parts. If the door sags, tighten the hinges or replace them if necessary. Align the door with the frame using shims or adjusting the hinge positions. Proper alignment ensures smooth operation and prevents gaps, enhancing security and weather resistance. Refer to the manual for specific instructions and consider lubricating hinges for optimal performance. Addressing alignment early maintains functionality and extends the shed’s lifespan.

Warranty and Support
Suncast offers a 10-year limited warranty for the 7×7 shed. For assistance, contact their customer support at 1-800-846-2345 or visit support.suncast.com.
Suncast Warranty Details
The Suncast 7×7 shed is backed by a 10-Year Limited Warranty, covering manufacturing defects in materials and workmanship. This warranty ensures your investment is protected against faulty components. For warranty claims, customers must register their product and provide proof of purchase. The warranty does not cover damage due to improper assembly, harsh weather conditions, or misuse. Repairs or replacements are handled through Suncast’s customer support team, emphasizing their commitment to customer satisfaction and product durability. Visit support.suncast.com for detailed warranty terms and conditions.
Contacting Suncast Customer Support
For assistance with assembly, warranty claims, or general inquiries, customers can reach Suncast Customer Support at 1-800-846-2345. Support is available Monday through Friday from 7:30 AM to 6:00 PM CST. Additionally, the Suncast Support Website offers a comprehensive resource for troubleshooting, product manuals, and FAQs. Customers can submit requests online or scan the provided QR code for direct access. Suncast’s dedicated team ensures prompt and effective solutions to help you enjoy your 7×7 shed with confidence and ease.
With the Suncast 7×7 shed assembled, you now have a durable, spacious storage solution. Its steel frame and multi-wall resin panels ensure long-lasting performance, making it a great investment for organizing your outdoor equipment.
Final Inspection and Safety Checks
After assembling your Suncast 7×7 shed, conduct a thorough inspection to ensure all components are securely fastened. Check door alignment, roof panel tightness, and anchor stability. Verify that all hardware, such as lag screws and masonry anchors, is properly secured. Inspect the structure for any gaps or misalignments. Ensure the shed is level and firmly anchored to the ground or platform. Perform a final walk-through to confirm everything is in perfect condition before use. This step ensures safety and longevity of your storage solution, providing peace of mind for years to come.